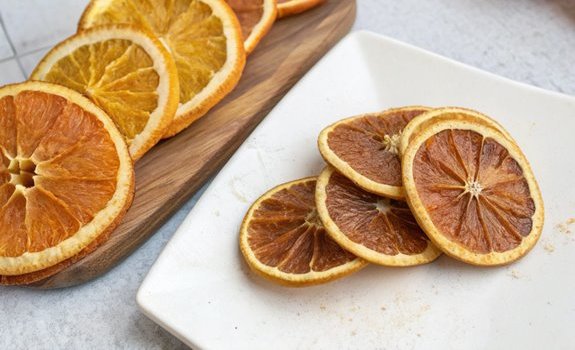
Dried Orange Slices
Imagine discovering a hidden treasure in your pantry—dried orange slices can be just that. These vibrant, sun-kissed morsels are packed with nutrients and versatility, making them an ideal addition to your kitchen. They can elevate your morning yogurt or serve as a charming garnish for festive drinks. But there’s more to these slices than meets the eye; their rich history and cultural significance might surprise you. What if you could reveal new ways to enjoy them that go beyond the usual?
Why You’ll Love This Recipe
Dried orange slices are a delightful addition to your kitchen, and you’ll love how versatile they are. They make a tasty, healthy snack that satisfies your sweet tooth without the guilt. You can enjoy them straight out of the bag or dip them in chocolate for a special treat.
These slices aren’t just for snacking. Use them as a beautiful garnish for drinks or desserts to impress your guests. You can even grind them into a powder to add a unique flavor boost to your recipes.
If you’re feeling crafty, dried orange slices can enhance potpourri or serve as charming seasonal decorations around your home. Additionally, their versatility makes them ideal for culinary presentations that enhance the visual appeal of your dishes.
Not only are they versatile, but they also pack a nutritional punch. With high vitamin C content, dietary fibers, and antioxidants, they support your immune system and help with digestion. You can include them in breakfast cereals, yogurt, or salads for added flavor and nutrition.
Plus, when stored correctly in an airtight container, these dried slices can last up to two years, making them a long-lasting pantry staple.
With all these benefits, dried orange slices are sure to become a favorite in your kitchen.
History
Oranges have a rich history that dates back centuries, intertwining with cultural traditions and seasonal celebrations. In medieval times, you’d find oranges used to decorate Christmas trees, a practice that continued into the Victorian era. Back then, they were often paired with popcorn and gilded nuts, creating festive displays.
The tradition of drying fruits like oranges began in ancient times, helping to preserve them during the winter months when fresh produce was scarce. By the 19th century, oranges became a staple in American Christmas traditions, linked to the legend of St. Nicholas, who famously filled stockings with gold. Additionally, dried oranges were primarily used as decorative elements in holiday decor, emphasizing their role in creating a festive atmosphere.
This custom evolved, and oranges symbolized warmth, cheer, and the return of light during the Winter Solstice. Before glass ornaments took center stage, natural elements like whole oranges adorned trees and created garlands, often combined with spices for a lovely fragrance.
Dried orange slices still carry this festive spirit, reminding us of their historical significance in celebrations. As you explore the world of dried orange slices today, you’re partaking in a tradition that spans centuries, connecting you to the joy and warmth of holiday seasons past.
Recipe

Dried Orange Slices
Dried orange slices are a delightful and versatile treat that can be used in a variety of ways. Whether you’re looking to enhance your baking, add a burst of flavor to your beverages, or simply enjoy a healthy snack, these dried slices are easy to make at home. With their vibrant color and natural sweetness, they not only make for a delicious snack but also serve as a beautiful garnish for cocktails and desserts. The freshness of the oranges impacts the flavor and quality, making it essential to choose the best fresh oranges.
To create your own dried orange slices, you’ll need just a few simple ingredients and some time. The process involves slicing fresh oranges, drying them in an oven or dehydrator, and then storing them for future use. This recipe will guide you through each step to guarantee your dried orange slices come out perfectly.
Ingredients:
– Fresh oranges
– Powdered sugar (optional, for aiding in drying)
Instructions:
- Begin by preheating your oven to 170°F (75°C) to 200°F (90°C). This low temperature will help dry the oranges without cooking them.
- Slice the oranges into 1/4-inch rounds using a sharp knife or mandoline. Make sure to maintain even thickness for consistent drying. Pat the slices dry with paper towels to remove excess moisture.
- Line a baking sheet with parchment paper and arrange the orange slices in a single layer, guaranteeing there’s enough space between each slice for air circulation.
- Place the baking sheet in the preheated oven and bake the orange slices for 2-4 hours. Flip the slices every 30 minutes to prevent burning and promote even drying.
- After 2-4 hours, check the slices. They should be dry to the touch and no longer moist. If they need more time, continue baking, checking regularly until they achieve the desired dryness.
- Once dried, remove the slices from the oven and allow them to cool completely on a wire rack before storing.
Extra Tips:
For best results, aim for thinner slices (about ⅛ inch) as they’ll dry faster. Keep an eye on the orange slices while they bake, as overheating can lead to browning or burning.
Different varieties of oranges may have varying drying times, so be prepared to adjust accordingly. Store your dried orange slices at room temperature in an airtight container after they’ve cooled. Enjoy your homemade dried orange slices as a snack, in teas, or as a decorative addition to your culinary creations!
Final Thoughts
Making your own dried orange slices not only provides delicious snacks but also opens up a world of culinary possibilities. These vibrant slices are packed with health benefits, including high levels of vitamin C and antioxidants, which boost your immune system and help fight inflammation.
Plus, their high fiber content supports digestive health, making them a smart choice for snacking. You’ll find that dried orange slices have a long shelf life, lasting up to two years when stored properly. In addition, they are a natural source of potassium, which helps maintain electrolyte balance in the body.
They serve as a versatile garnish for drinks, desserts, and even potpourri, adding a lovely touch to your culinary creations. If you’re looking to enhance flavors, ground dried orange slices can be a natural addition to various dishes.
Not only are they low in calories and fat-free, but they also provide essential nutrients like potassium and calcium. Whether you enjoy them as a healthy snack or incorporate them into craft projects, dried orange slices offer a delightful way to enjoy the many benefits of oranges.
FAQ
If you’re curious about dried orange slices, you’re not alone. Many people wonder about the best ways to dry them and their health benefits.
There are three main methods for drying: natural drying, oven drying, and using a food dehydrator. For oven drying, preheat your oven to 200°F, and slice the oranges thinly—about ⅛ to ¼ inch thick. Spread the slices on a lined baking sheet, leaving space between them. Bake for 2 to 4 hours, flipping every 30 minutes until they reach your desired dryness. Fresh, firm oranges are preferred for quicker drying and better final texture.
Dried orange slices aren’t just tasty; they’re healthy too! They’re loaded with fiber, potassium, and antioxidants, which can help boost your immune system and improve digestion.
When it comes to storage, let the slices cool completely before placing them in an airtight container to keep them fresh.
You might also be wondering how to use dried orange slices. They make great snacks, can be added to tea, or used in crafts and decorations.
With these tips, you’re ready to enjoy dried orange slices in various ways!
Dried Orange Slices
Ingredients
- Ingredients:
- - Fresh oranges
- - Powdered sugar optional, for aiding in drying
Instructions
- Instructions:
- Begin by preheating your oven to 170°F (75°C) to 200°F (90°C). This low temperature will help dry the oranges without cooking them.
- Slice the oranges into 1/4-inch rounds using a sharp knife or mandoline. Make sure to maintain even thickness for consistent drying. Pat the slices dry with paper towels to remove excess moisture.
- Line a baking sheet with parchment paper and arrange the orange slices in a single layer, guaranteeing there's enough space between each slice for air circulation.
- Place the baking sheet in the preheated oven and bake the orange slices for 2-4 hours. Flip the slices every 30 minutes to prevent burning and promote even drying.
- After 2-4 hours, check the slices. They should be dry to the touch and no longer moist. If they need more time, continue baking, checking regularly until they achieve the desired dryness.
- Once dried, remove the slices from the oven and allow them to cool completely on a wire rack before storing.
- Extra Tips:
- For best results, aim for thinner slices (about ⅛ inch) as they'll dry faster. Keep an eye on the orange slices while they bake, as overheating can lead to browning or burning.
- Different varieties of oranges may have varying drying times, so be prepared to adjust accordingly. Store your dried orange slices at room temperature in an airtight container after they've cooled. Enjoy your homemade dried orange slices as a snack, in teas, or as a decorative addition to your culinary creations!